The Blizzard to End Them All
- mityoyo2018
- Dec 12, 2018
- 5 min read

Reflecting back to the beginning of the semester, we have come such a long way. Our first designs were definitely very ambitious especially without a scale of how small the components we projected to make would have been. Below is an image from our first group meeting where we decided on a snow globe yo-yo design.
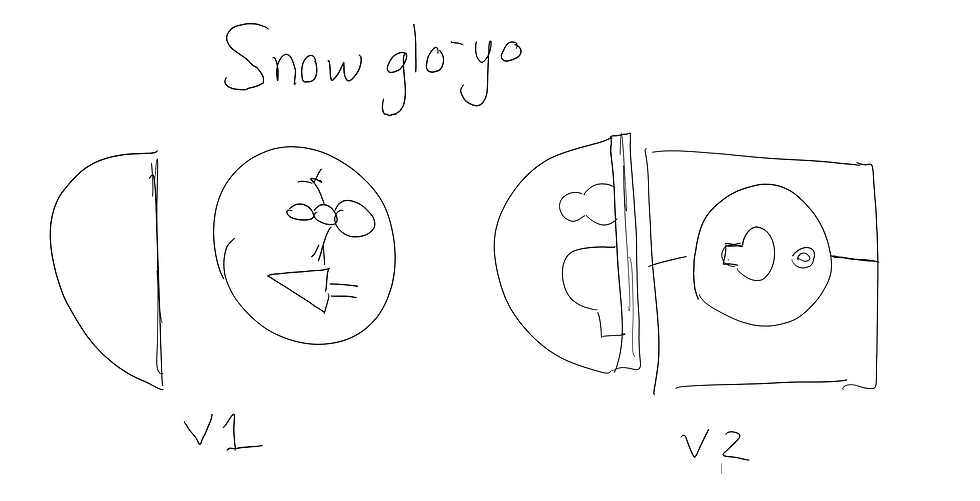
Design version one was eventually chosen, and the simplicity of just having the snowman was integral in making our project feasible. Our main goal from the beginning was to make a yo-yo that mimicked a snow globe as much as possible. We initially considered adding water inside of the dome of our yo-yo, but due to the complexity of our design, we decided against including the water. Instead, fake snow and a yo-yo stand were added to provide more of a snow globe aesthetic. These additions had a remarkable difference in the aesthetics to mimic a snow globe. Additionally, the yo-yo works very well, and one can also use it to complete tricks like a traditional one. Here is a video outlining our journey through the semester to manufacture our 50 sno-yos.
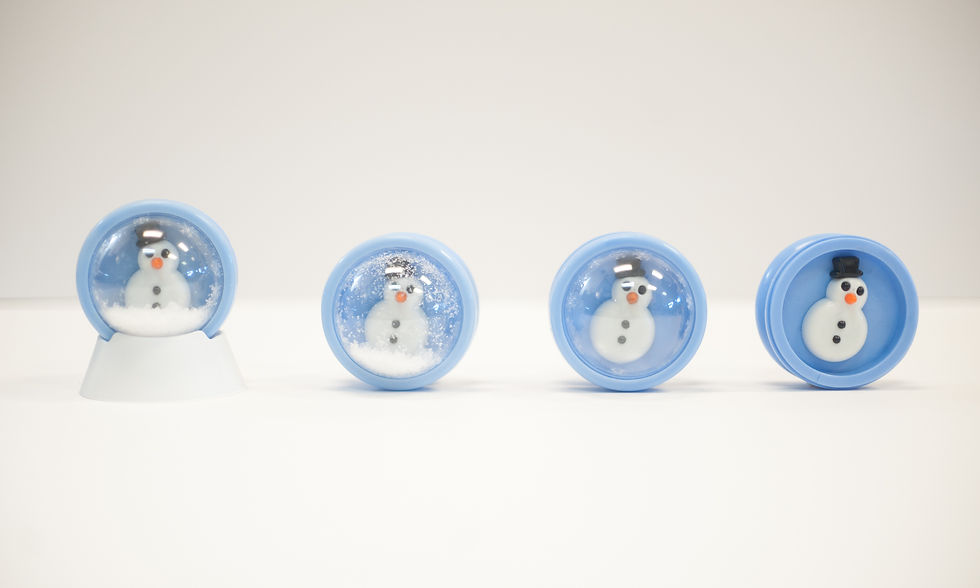
Below are the parts that came together to create the full yo-yos as pictured below.


The body of the yo-yo and snap ring could be tighter which would be the biggest area for improvement. The buttons and nose were difficult to press in, but once in, they fit very well within the body of the snowman. The body of the snowman was integral in the assembly of the yo-yo because so many of the parts relied on connecting to this part. It was an amazing success that all of the parts were able to fit into the snowman. The most difficult parts to press in were the buttons and nose because the holes that these parts went into were not filleted to guide the part in as the eye holes had. The filleting of the snowman eye-holes design was done because of size-constraints of the smallest drill-bit. This turned out to be a blessing because the eyes were very easy to push in to the snowman.
Our final injection molded yo-yo looks drastically different than our initial prototyped yo-yo that was 3D printed to ensure our design looked feasible. In this 3D printed model, the layers are visible which reveals that it was made through additive manufacturing. While stereolithography is a type of additive manufacturing that has a better surface finish than fused filament fabrication, it still is not a clean surface as can be found using injection molding. Still, the benefits of 3D printing are that there are no gates that cause an imperfection at 2 locations along the outer diameter of the body and on one side of all of the smaller parts that may cause the parts to not fit together perfectly.

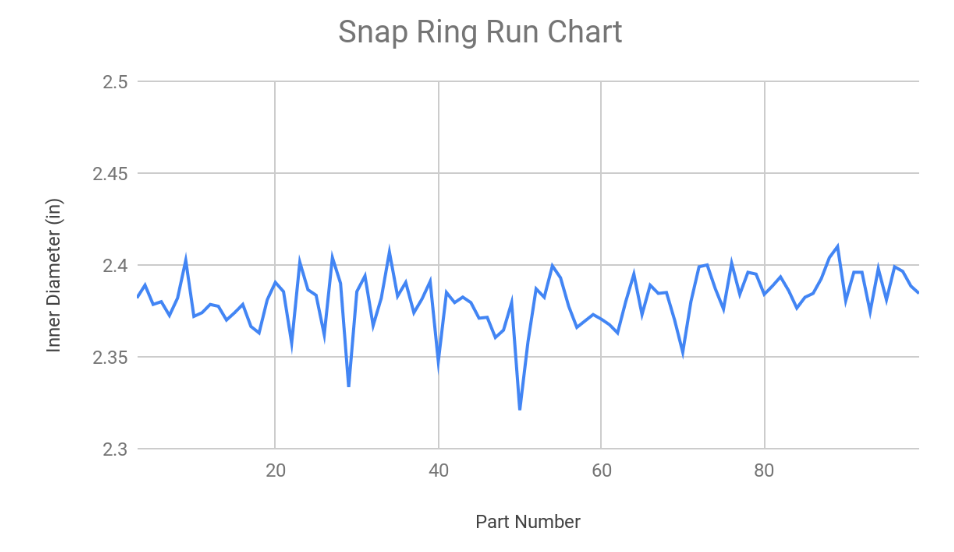
To ensure that most of the injection molded parts fit together, we created control charts. These were also used to make sure that any errors that could occur wouldn't be caught until too late. The following data was completed for the snap ring's inner
diameter, but similar results were found for all pieces. The data follows a normal distribution curve. The range chart shows that the variation is under control while the xbar chart shows that the process mean is slightly out of control.


Once the parts were all created, we determined how much it costs to bring all of these yo-yos together. The numbers were completed for the 50 yo-yos we created, but the cost to make these yo-yos in a much greater number would be drastically different. We found that the cost per yoyo for 50 yo-yos would be $48.41 for a total cost for 50 yo-yos to be $2420.50.


A relationship between the production amount and price to make each yo-yo is displayed in the graph above.

Through much more detailed analysis, we created a case where instead of injection molded, the yo-yos were completely 3D printed. In this case, there isn't much change in price of the yo-yo as the volume of production rises dramatically unlike in the case where the yo-yo is created using injection molding as the creation process.
Mass manufacturing is unfeasible in the LMP lab because there are only 2 injection molding machines and it would take much too long to create all the yo-yo parts. Therefore, this space is best used for low-quantity production of yo-yos for prototyping. Instead, for mass production of yo-yos in much larger quantities would be best done in another lab that was meant for mass manufacturing. Additionally, if the injection molded yo-yos were made in a much larger quantity, the price would go down drastically if created in an external lab. This is proven by the graphs below that show the graph for cost in a mass manufacturing lab for production volumes that are very large.
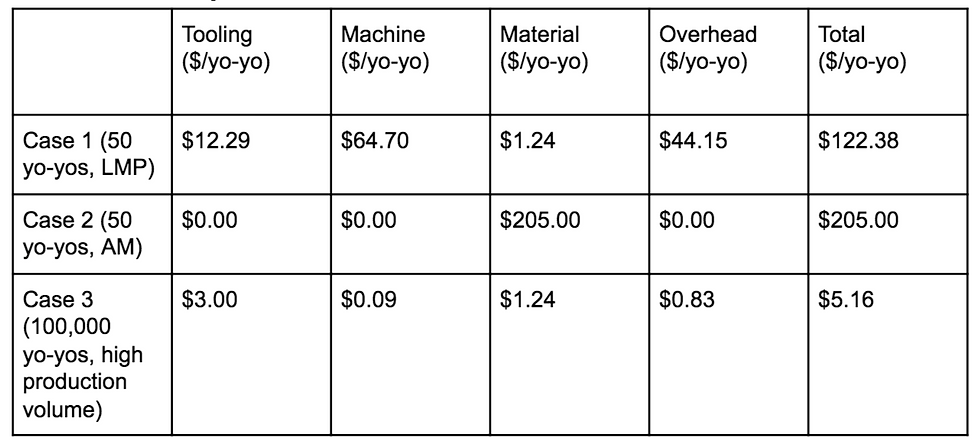
In the 3D printing case, we do not pay for tooling, the machine, or overhead as it is all handled by the external vendor. Thus the "material" is all we are paying for, or the finished assembled good. When the yo-yos are created in the LMP lab, the machine cost is the most expensive part, which makes sense as we are producing at such low volume we have not yet reaped the benefits of the mass production possible by the injection molding machine. If done in an external lab, the material cost is the most expensive part, which makes sense as we have optimized our process cost to be low as we are at a high production rate.
If this design was taken into a high production volume, there would need to be changes on how it was created. For one, the amount of pieces that need to be assembled would need to be reduced especially due to their tiny size. It would be a good idea to create these aesthetic components combined with the snowman part and painted a different color after it was injection molded. Additionally, this would mean there wouldn't be a gate mark on the buttons and eyes as seen in the red circle around the button in the image below. Another defect that would be eliminated is a tiny short-shot that could not be resolved because the space was too tiny to fill in time no matter what any of the parameters were as seen in the red circle above the snowman's nose in the photo below.

Additionally, the top hat and santa hat would need to have a much larger draft angle to ensure that they would not get stuck inside of the mold which occurred a few times during our production runs. With these changes, our design would be much more reasonable to create in large volume production runs.
All in all, I can speak for the entire team when I say this class was a very enjoyable. I couldn't have imagined learning so much in one class, but I feel as though my understanding on how basically everything is made has completely transformed. No longer am I only curious on how it was made or why, but also how I can change the manufacturing process to make the design better or more efficiently built.


Comments